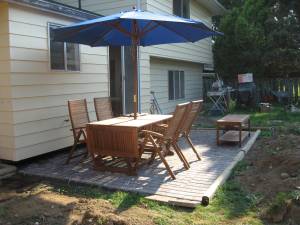
Spouse Collaboration and a Paver Patio
Quite some time ago the Renovator ripped the “red-neck” white painted wood deck (I use the term deck loosely) down. Complete with hole infested corrugated plastic roof, the neighbors were as happy to see it go as we were.
In its place, we decided that a 10′ x 10′ ground-level patio made of pavers would be an attractive option. We chose pavers because they are affordable, durable, create a more designer look than concrete, are low maintenance, easy to install and easy to transport.
My husband, the Renovator, spoke with my dad, Mr. do-it-yourself and together they hatched a plan to purchase “seconds” at a greatly reduced price. We got a fabulous deal, including a small batch of leftovers which were free of charge, and the entire 10′ x 10′ cost us just $160.
Lesson #1 – don’t discount family connections.
Lesson #2 – seconds are a great value and don’t necessarily mean they look bad. Our seconds, when placed strategically, look as good as anyone else’s new, $4.00 / sq. ft. pavers.
Basic how tos – you’ll see some of this in the video:
1. Decide on space. Measure and mark the layout. Estimate material needs. When you buy materials, be clear with the supplier what your actual square footage is so that you have enough for cutting as well.
2. Dig down about 7 or 8 inches depending on the thickness of your pavers and where you want the top of your patio to be. Ensure you have reached hard, undistrubed ground.
3. Prep the space with crushed limestone, compact it, then cover with 2″ of sand. We dug down 7″, used 2″ of limestone and 2″ of sand – our pavers are 3″ thick.
4. Place pavers, keeping them as level as possible and keeping edges tight together. Tap them in with a rubber mallet. Install whole pavers first then cut all part pavers at one time, tapping them into place to complete the layout. To cut the pavers you can rent a masonary saw, or a tile saw. We have a wet tile saw and it works fine for this size of paver.
5. Sand the top of the pavers, spreading sand with a broom. Run compactor or tamper over them. Sand again and possibly a third time if you like.
We already love the patio, even though we still need to put some steps in! Renovating can be a slow process, but it’s in our blood.
That’s why I’m the Renovator’s Wife! 🙂

Just needs beverages!

Ronda Payne
A writer since she first held a pen, Ronda Payne – aka: the Girl with a Pen, is passionate about words. In 2007, she kissed ‘real jobs’ goodbye and began her true career as a copywriter, non-fiction freelance writer (magazines and other periodicals) and creative writer.